Breaking Down AI - Exploring Image Classification with Neural Networks
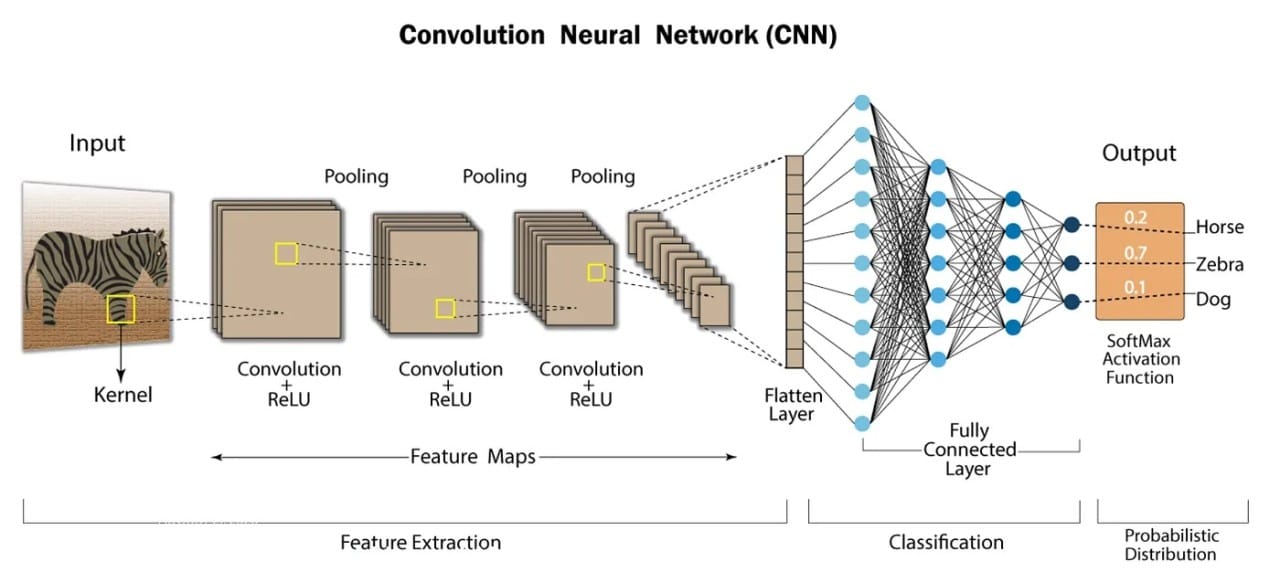
When I started this project is was based on a recommendation from a friend. I didn't know at that time what I was embarking on was a Convolutional Neural Network journey. That is what it ended up being though, to further explore the concept I wrote a companion blog post about CNNs to provide a bit more context and to learn more about them myself.
Full Jupyter Notebook for this post is here:
https://github.com/cskujawa/jupyter-notebooks/blob/main/ML/FullBowl/FullBowl.ipynb
Project Overview
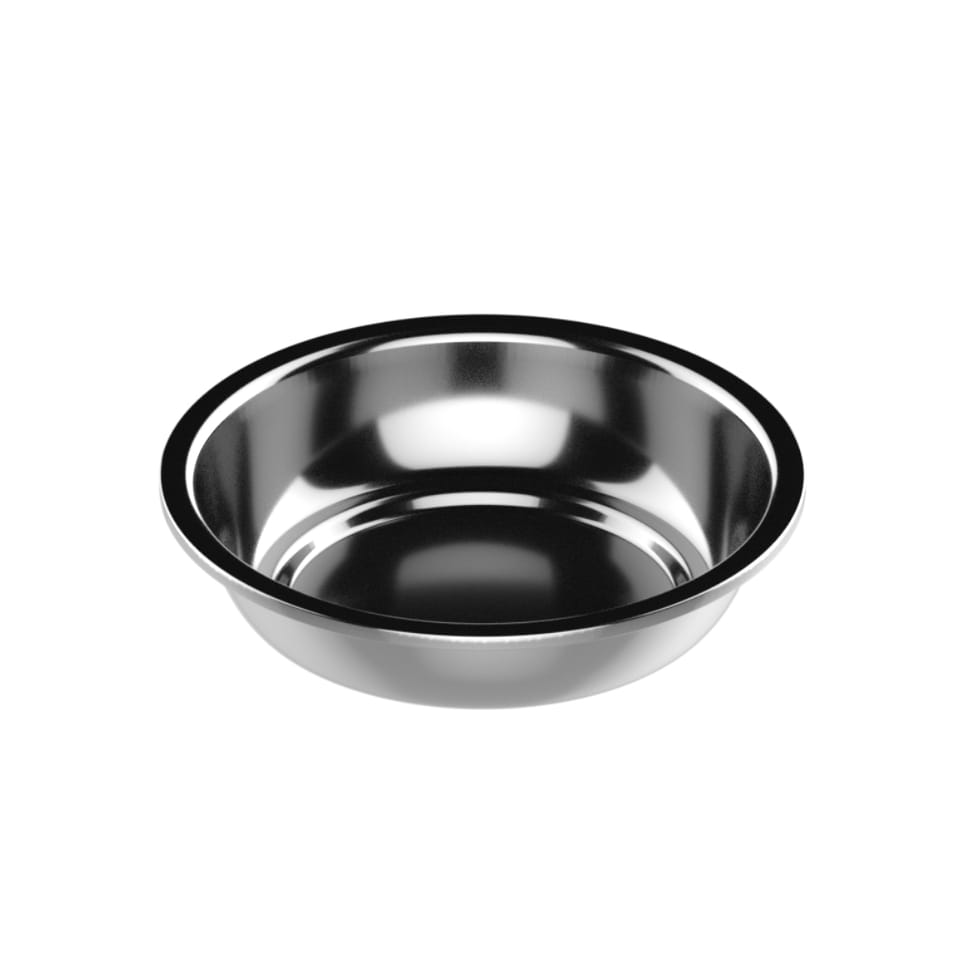
The goal of this project was to build a model capable of classifying images of bowls as either full or empty. The project was implemented using Python in a Jupyter Notebook, leveraging the power of deep learning frameworks like Torch. Here's a step-by-step guide to the process, including detailed notes from the notebook to provide additional context and insights.
Step 1: Setting Up the Environment
Before diving into the code, it was essential to set up the environment. This included installing the necessary libraries and frameworks.
torch: Core library.torch.utils.data.DataLoader: Utility to load data in batches.torchvision.datasets: Contains many standard vision datasets.torchvision.transforms: Common image transformations.datasets.load_dataset: Function to load datasets from Hugging Face.ViTFeatureExtractor: A feature extractor for ViT models.
import numpy as np
import tensorflow as tf
from tensorflow.keras.models import Sequential
from tensorflow.keras.layers import Dense, Conv2D, Flatten, MaxPooling2D
from tensorflow.keras.preprocessing.image import ImageDataGenerator
import matplotlib.pyplot as plt
import cv2
Step 2: Preparing the Data
The data preparation phase involved loading and preprocessing the images. This step is crucial as it ensures the data is in the right format for training the model. The images were resized, normalized, and augmented to improve the model's performance and generalization.
Loading and Preprocessing Images
# Load dataset
dataset = load_dataset('training', data_dir='data')

# Split the dataset into training and validation sets
train_test_split = dataset['train'].train_test_split(test_size=0.2)
train_dataset = train_test_split['train']
eval_dataset = train_test_split['test']

# Transform function
def transform(example_batch):
    # Convert images to RGB and apply feature extraction
    images = [image.convert("RGB") for image in example_batch['image']]
    inputs = feature_extractor(images, return_tensors='pt')
    inputs['labels'] = example_batch['label']
    return inputs

# Apply transformations to datasets
train_dataset.set_transform(transform)
eval_dataset.set_transform(transform)
Step 3: Load the ViT model
This phase is where we load the pre-trained Vision Transformer (ViT) model and its corresponding feature extractor from Hugging Face. It prepares the model for image classification tasks with the specified number of output labels.
Libraries:
ViTForImageClassification: Model class for Vision Transformer.from_pretrained: Loads a pre-trained model from Hugging Face's model hub.num_labels: Number of output labels.ignore_mismatched_sizes: Useful for fine-tuning a model with different input sizes.
model = ViTForImageClassification.from_pretrained('google/vit-base-patch16-224', num_labels=2, ignore_mismatched_sizes=True)

training_args = TrainingArguments(
    output_dir='./results',
    per_device_train_batch_size=8,
    per_device_eval_batch_size=8,
    num_train_epochs=3,
    evaluation_strategy="epoch",
    save_strategy="epoch",
    logging_dir='./logs',
)
Step 4: Training the Model
Training the model involved feeding it the prepared images and letting it learn the distinguishing features of full and empty bowls. This was done over multiple epochs, with the model's performance being evaluated on a validation set.
Set up optimizer and learning rate scheduler
This block sets up the optimizer and learning rate scheduler for training the model. The optimizer updates the model parameters to minimize the loss function, while the learning rate scheduler adjusts the learning rate during training to improve performance.
Libraries:
AdamW: Optimizer with weight decay fix, recommended for transformers.get_scheduler: Utility to get a learning rate scheduler.tqdm.auto.tqdm: Progress bar library.
from transformers import AdamW, get_scheduler
from tqdm.auto import tqdm

optimizer = AdamW(model.parameters(), lr=5e-5)

num_epochs = 3
num_training_steps = num_epochs * len(train_loader)
lr_scheduler = get_scheduler(
    name="linear", optimizer=optimizer, num_warmup_steps=0, num_training_steps=num_training_steps
)

progress_bar = tqdm(range(num_training_steps))

model.train()
for epoch in range(num_epochs):
    for batch in train_loader:
        # Move batch to device (GPU or CPU)
        batch = {k: v.to(model.device) for k, v in batch.items()}

        # Forward pass
        print(f"batch: {batch}")
        outputs = model(**batch)
        loss = outputs.loss

        # Backward pass
        loss.backward()

        # Update weights
        optimizer.step()
        lr_scheduler.step()
        optimizer.zero_grad()
        progress_bar.update(1)

        # Print loss for debugging
        progress_bar.set_postfix({"loss": loss.item()})
Step 5: Evaluating the Model
After training, ideally the model's performance would be evaluated on a separate test set, but I was tired of sourcing images for the dataset so I used the existing images. This step would usually provide insights into how well the model generalized to new, unseen data.
Libraries:
model.eval(): Sets the model to evaluation mode.torch.no_grad(): Disables gradient calculation for faster evaluation.batch.items(): Iterates over the items in a batch.
model.eval()
total_correct = 0
total_samples = 0

for batch in eval_loader:
    with torch.no_grad():
        # Move batch to device (GPU or CPU)
        batch = {k: v.to(model.device) for k, v in batch.items()}

        # Forward pass
        outputs = model(**batch)

        # Access logits
        logits = outputs.logits

        # Get predictions
        predictions = torch.argmax(logits, dim=-1)

        # Get true labels (assuming they are in 'labels' key of batch)
        labels = batch['labels']

        # Count correct predictions
        correct = (predictions == labels).sum().item()

        # Update totals
        total_correct += correct
        total_samples += labels.size(0)

# Calculate accuracy
accuracy = (total_correct / total_samples) * 100
print(f"Accuracy: {accuracy:.2f}%")st_generator)
print(f'Test accuracy: {test_accuracy:.2f}')
Step 6: Save the model and feature extractor
After training and evaluating I saved the trained model and the feature extractor to disk so that they can be loaded and used later without retraining.
Libraries:
save_pretrained: Saves the model and feature extractor for later use.
model.save_pretrained('models/cat_bowl_model')
feature_extractor.save_pretrained('models/cat_bowl_model')
Step 7: Making Predictions
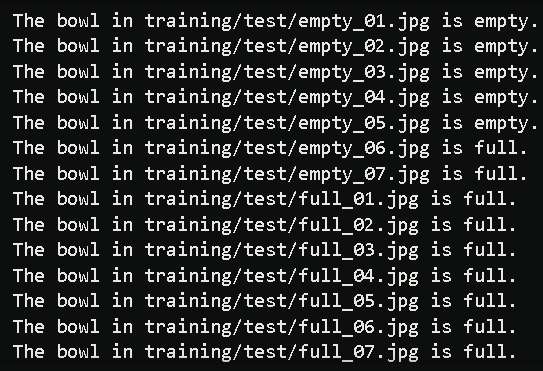
Finally, the model was used to make predictions on new images, if only just a few (images 6 and 7 for the full and empty bowls.) This section demonstrates how to load the saved model and feature extractor, preprocess a new image, and make a prediction using the model. It also prints the predicted label for the given image.
Libraries:
PIL.Image: Python Imaging Library, used to open and manipulate images.ViTImageProcessor: Processes images for the ViT model.model(**inputs).logits: Forward pass to get logits (raw model outputs).logits.argmax(-1): Gets the index of the highest logit, representing the predicted class.
from transformers import ViTImageProcessor, ViTForImageClassification
from PIL import Image

# Load the fine-tuned model and image processor
model = ViTForImageClassification.from_pretrained('models/cat_bowl_model')
processor = ViTImageProcessor.from_pretrained('models/cat_bowl_model')

# Function to load and preprocess the image
def load_and_preprocess_image(image_path):
    image = Image.open(image_path)
    inputs = processor(images=image, return_tensors="pt")
    return inputs

# Function to predict if the bowl is full or empty
def predict(image_path):
    inputs = load_and_preprocess_image(image_path)
    inputs = {k: v.to(model.device) for k, v in inputs.items()}  # Move to device
    with torch.no_grad():
        outputs = model(**inputs)
    logits = outputs.logits
    predicted_class_idx = logits.argmax(-1).item()
    return predicted_class_idx

# Class labels
class_labels = ["empty", "full"]

# Main function for CLI
def main():
    image_path = "training/test/empty_01.jpg"
    predicted_class_idx = predict(image_path)
    print(f"The bowl in {image_path} is {class_labels[predicted_class_idx]}.")
    image_path = "training/test/empty_02.jpg"
    predicted_class_idx = predict(image_path)
    print(f"The bowl in {image_path} is {class_labels[predicted_class_idx]}.")
    image_path = "training/test/empty_03.jpg"
    predicted_class_idx = predict(image_path)
    print(f"The bowl in {image_path} is {class_labels[predicted_class_idx]}.")
    image_path = "training/test/empty_04.jpg"
    predicted_class_idx = predict(image_path)
    print(f"The bowl in {image_path} is {class_labels[predicted_class_idx]}.")
    image_path = "training/test/empty_05.jpg"
    predicted_class_idx = predict(image_path)
    print(f"The bowl in {image_path} is {class_labels[predicted_class_idx]}.")
    image_path = "training/test/empty_06.jpg"
    predicted_class_idx = predict(image_path)
    print(f"The bowl in {image_path} is {class_labels[predicted_class_idx]}.")
    image_path = "training/test/empty_07.jpg"
    predicted_class_idx = predict(image_path)
    print(f"The bowl in {image_path} is {class_labels[predicted_class_idx]}.")
    image_path = "training/test/full_01.jpg"
    predicted_class_idx = predict(image_path)
    print(f"The bowl in {image_path} is {class_labels[predicted_class_idx]}.")
    image_path = "training/test/full_02.jpg"
    predicted_class_idx = predict(image_path)
    print(f"The bowl in {image_path} is {class_labels[predicted_class_idx]}.")
    image_path = "training/test/full_03.jpg"
    predicted_class_idx = predict(image_path)
    print(f"The bowl in {image_path} is {class_labels[predicted_class_idx]}.")
    image_path = "training/test/full_04.jpg"
    predicted_class_idx = predict(image_path)
    print(f"The bowl in {image_path} is {class_labels[predicted_class_idx]}.")
    image_path = "training/test/full_05.jpg"
    predicted_class_idx = predict(image_path)
    print(f"The bowl in {image_path} is {class_labels[predicted_class_idx]}.")
    image_path = "training/test/full_06.jpg"
    predicted_class_idx = predict(image_path)
    print(f"The bowl in {image_path} is {class_labels[predicted_class_idx]}.")
    image_path = "training/test/full_07.jpg"
    predicted_class_idx = predict(image_path)
    print(f"The bowl in {image_path} is {class_labels[predicted_class_idx]}.")

if __name__ == "__main__":
    main()
Conclusion
And finally, the results. Different training runs have resulted in varying results. There is always a degree of inaccuracy with this project, and I believe that to be due largely to the limited dataset used for training.
There is a lot of ways that this project could be continued to further improve it's accuracy.
- Data Augmentation: Although some augmentation was applied, further augmenting the dataset with more varied transformations (such as rotations, flips, and color adjustments) could help the model generalize better.
- Increasing Dataset Size: Collecting more images for training could significantly enhance the model's ability to learn diverse features, leading to better performance.
- Hyperparameter Tuning: Experimenting with different hyperparameters, such as learning rates, batch sizes, and optimizer choices, could yield better training outcomes.
- Advanced Architectures: Implementing more advanced architectures like ResNet, VGG, or EfficientNet, which are designed to handle image classification tasks more effectively, could improve accuracy.